That pile of old, unworn t-shirts in your closet holds endless potential. Before you toss them, consider the transformative power of a simple pair of scissors. Learning how to upcycle your clothes is not just sustainable; it’s a creative way to express your personal style. This ultimate guide explores 99 ways to cut a t-shirt, turning basic tops into unique, custom pieces. Whether you’re a seasoned DIY pro or a complete beginner, you’ll find easy, no-sew techniques to create everything from edgy crop tops and intricate back designs to stylish new necklines. Let’s grab some scissors and get started.
Why You Should Start Cutting Your T-Shirts
Upcycling your t-shirts is more than just a fun craft project. It’s a sustainable practice that saves money, reduces clothing waste, and empowers you to create a wardrobe that is truly your own.
- Sustainability: By giving an old shirt a new life, you keep it out of the landfill. The fashion industry is a major contributor to waste, and every small act of upcycling makes a difference.
- Cost-Effective Style: Instead of buying new clothes to keep up with trends, you can create them yourself for free. A simple cut can turn a basic tee into a trendy muscle tank or a festival-ready fringe top.
- Perfect Fit: Not all t-shirts fit perfectly off the rack. Custom cutting allows you to adjust the length, neckline, and sleeves to flatter your body shape exactly how you like.
- Unleash Creativity: This is your chance to experiment. Play with different cuts, knots, and weaves to create one-of-a-kind pieces that no one else will have.
Getting Started: Tools and Tips for Success
You don’t need a full sewing kit to get started. For most of these designs, a few basic tools will do the trick.
Essential Tools:
- A Sharp Pair of Fabric Scissors: This is your most important tool. Fabric scissors provide a clean, crisp cut and prevent the jagged edges that regular scissors can cause.
- A Ruler or Measuring Tape: For symmetrical and straight lines, a ruler is your best friend.
- Chalk or a Fabric Marker: Mark your cut lines before you start snipping. The marks will wash right off.
- A Cutting Mat (Optional): A self-healing cutting mat protects your surfaces and can make cutting with a rotary cutter easier and more precise.
Pro Tips for Clean Cuts:
- Wash and Iron First: Always start with a clean, wrinkle-free t-shirt for the most accurate cuts.
- Start Small: You can always cut more off, but you can’t add it back. Be conservative with your first snip.
- Stretch the Edges: For that classic, rolled-edge look on jersey knit tees, gently pull on the edges of your cuts. The fabric will naturally curl, hiding any minor imperfections.
- Practice on an Old Tee: If you’re nervous, do a trial run on a shirt you don’t care about.
99 Ways to Cut a T-Shirt: The Complete List
Here are 99 ideas categorized by the part of the shirt you want to transform. Mix and match these techniques to create your own unique designs!
Section 1: Creative Neckline Cuts (Ways 1-20)
Changing the neckline is the fastest way to alter a shirt’s entire look.
Classic Neckline Mods
- The Deep V-Neck: Mark a “V” shape at the center of the collar and cut.
- The Wide Scoop Neck: Cut from shoulder to shoulder in a curved “U” shape.
- The Off-the-Shoulder Look: Cut a wider boat neck that can be pulled off one shoulder.
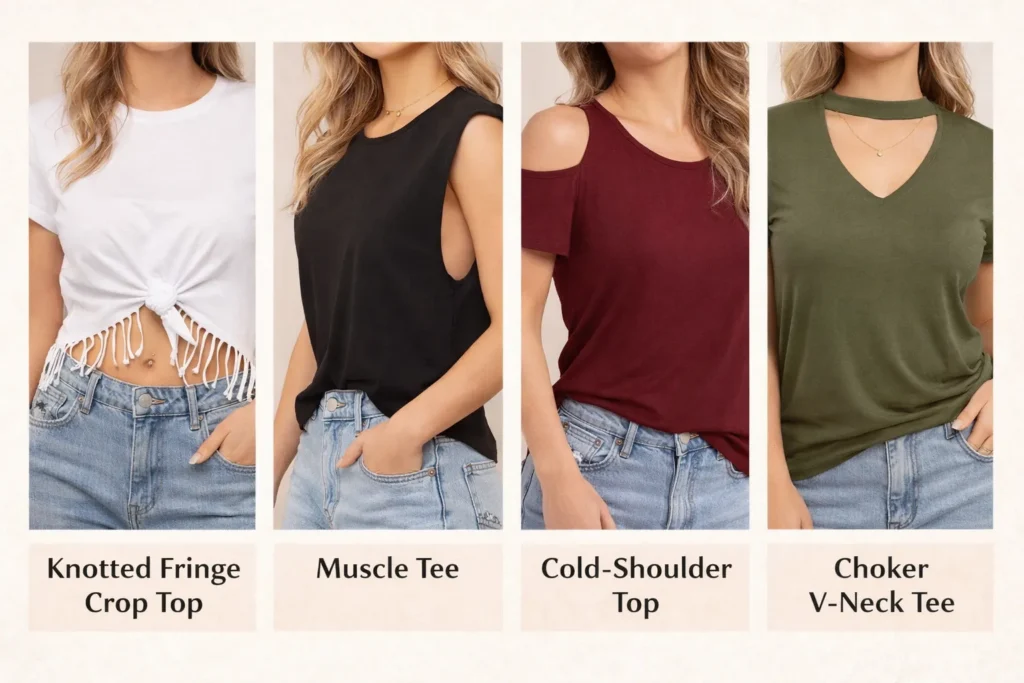
- The Choker V-Neck: Cut a V-neck but leave a thin strip of the original collar in the middle to create a built-in choker.
- The Notched Neckline: Make a small, 2-inch vertical slit at the center of the collar.
- The Asymmetrical Neck: Cut a diagonal line from one shoulder down toward the opposite armpit.
Strappy and Woven Necks
- The Ladder Neck: Cut several horizontal strips out of the V-neck area, leaving a “ladder” effect.
- The Braided Collar: Cut off the collar, then cut vertical slits around the neckline. Weave the strips together to form a braid.
- The Criss-Cross Neck: Cut a deep V, then use the scraps to create thin straps that crisscross over the opening.
- The Keyhole Cutout: Cut a small circle or diamond shape just below the collar.
- The Grommet Neckline: Punch holes along the neckline and thread a ribbon or cord through them.
- The Corset Neck: Similar to the grommet neck, but create a lace-up corset effect down a deep V.
Deconstructed Necks
- The Slashed Collar: Make several small, vertical cuts all around the collar band.
- The Fringed Bib: Cut vertical strips from the collar down to the chest area.
- The Distressed Neck: Use sandpaper or a razor to gently fray the edges of the collar.
- The Double-Layer Neck: Wear two shirts; cut a deep scoop neck on the top one to reveal the collar of the shirt underneath.
- The Inverted V-Neck: Cut a V-shape from the back of the collar instead of the front.
- The Halter Neck: Cut off the sleeves and collar, then tie the shoulder straps behind your neck.
- The Sweetheart Neckline: Cut a curved shape that mimics a sweetheart dress neckline.
- The Fully Removed Collar: Simply cut the entire ribbed collar off for an instant raw-edge look.
Section 2: Stylish Sleeve Transformations (Ways 21-40)
From sleeveless to statement sleeves, this is where you can really have fun.
Sleeveless & Tank Top Styles
- The Classic Muscle Tee: Cut off the sleeves right at the seam for a simple tank.
- The Deep Drop Armhole: Create a muscle tee but cut the armholes down toward the waist for a side-draping effect.
- The Capped Sleeve: Cut off the sleeve, leaving just a small “cap” of fabric over the shoulder.
- The Fringed Cap Sleeve: Cut the remaining cap into thin vertical strips.
- The Racerback Tank: Cut off the sleeves and cut the back into a T-shape to create a sporty racerback.
- The Knotted Tank: Cut off the sleeves and collar. Cut the shoulder straps and tie them into knots.
Short Sleeve Designs
- The Slashed Sleeve: Make several horizontal or vertical cuts along the sleeve.
- The Ladder Sleeve: Cut out horizontal sections of the sleeve to create a ladder effect.
- The Woven Sleeve: Cut vertical slits in the sleeve and weave them together.
- The Cold-Shoulder Cutout: Cut a semi-circle out of the top of the shoulder on each sleeve.
- The Puff Sleeve: Add an elastic band to the hem of the sleeve to cinch it and create a puff.
- The Bow-Tie Sleeve: Cut a slit down the top of the sleeve and tie the two sides together with a ribbon or fabric scrap.
- The Petal Sleeve: Cut the sleeve into a petal shape that overlaps at the top of the shoulder.
- The Fringe Sleeve: Cut the bottom half of the sleeve into long, hanging fringe.
- The Grommet Sleeve: Add metal grommets along the top of the sleeve for an industrial look.
3ax. The Rolled and Tacked Sleeve: Roll the sleeve hem up a few times and add a few stitches to hold it in place.
Long Sleeve Ideas
- The Split Sleeve: Cut a slit all the way down the top of a long sleeve.
- The Elbow Cutout: Cut out ovals at the elbows for a trendy look.
- The Thumbhole Cuff: Cut a small, vertical slit in the seam of the cuff to create a thumbhole.
- The Bell Sleeve: Cut the side seam of the sleeve and insert a triangle-shaped piece of fabric to create a bell shape.
Section 3: On-Trend Crop Tops & Hemlines (Ways 41-60)
Cropping a shirt is a classic DIY. Here’s how to take it to the next level.
Simple Crops & Hems
- The Basic Crop: Cut straight across the bottom to your desired length.
- The High-Low Hem: Cut the front shorter than the back.
- The V-Hem: Cut the front hem into a “V” shape, pointing down.
- The Curved Hem: Create a rounded, scalloped hemline.
- The Side Slits: Cut vertical slits up the side seams for more movement.
- The Asymmetrical Hem: Cut the hem at a sharp diagonal angle.
Knotted and Tied Hems
- The Front-Tie Crop: Cut the front hem up the middle and tie the two pieces in a knot.
- The Side-Tie Top: Cut slits on both side seams and tie them.
- The Back-Tie Crop: Cut the back hem up the middle and tie it for a fitted look.
- The Double-Knot Crop: Cut four strips at the front hem and tie them into two separate knots.
- The Woven Front: Cut slits up the front and weave them together.
- The Cinch-Waist Top: Cut a channel in the hem and thread a drawstring through it.
Fringe and Textured Hems
- The Classic Fringe: Cut long, vertical strips along the bottom hem.
- The Beaded Fringe: Add beads to the ends of each fringe strip.
- The Knotted Fringe: Tie small knots at the top or bottom of each fringe strip.
- The Diamond Fringe: Tie adjacent fringe strips together to create a diamond pattern.
- The Ruffled Hem: Cut a long strip of fabric, gather it, and sew it to the bottom for a ruffle.
- The Scalloped Edge: Use a cup or small bowl to trace and cut a scalloped pattern along the hem.
- The Distressed Hem: Use a cheese grater or sandpaper to rough up the hemline.
- The Tassel Hem: Group fringe strips together and tie them to create tassels.
Section 4: Stunning Back Designs (Ways 61-80)
Make your exit as stylish as your entrance with these creative back cuts.
Cutout & Slashed Backs
- The Angel Wings: Draw and cut out two wing shapes on the back of the shirt.
- The Spine Cut: Cut horizontal strips down the center of the back, then pull to create a “spine” look.
- The Heart Cutout: Fold the shirt in half and draw/cut a half-heart shape on the back.
- The Diamond Cutout: Cut a large diamond or rhombus shape out of the back.
- The Skull Cutout: A more advanced design involving intricate cuts to create a skull shape.
- The Bow Back: Cut horizontal strips down the back and use a vertical strip of fabric to cinch them together into bows.
- The Slashed Back: Make multiple diagonal cuts across the entire back panel.
- The Tree of Life: Cut a central “trunk” and then cut “branches” extending outwards.
- The Sunburst Back: Cut slits radiating out from a central point on the upper back.
Woven & Strappy Backs
- The Macrame Back: Use knotting techniques on vertical strips to create a macrame pattern.
- The Dreamcatcher Weave: Cut out a circle and weave yarn or fabric strips in a dreamcatcher pattern.
- The Braided Racerback: Cut a T-shape in the back and braid the vertical strip.
- The Criss-Cross Back: Cut out the back panel and replace it with wide, crisscrossing straps.
- The Corset Back: Create a lace-up detail down the spine of the shirt.
- The Open Back with a Bow: Cut out a large scoop in the back and add a bow at the top or bottom.
- The Triple Keyhole Back: Cut three small, vertically aligned circles down the back.
- The Woven Spine: Cut horizontal strips and loop each one through the one below it.
- The Strappy Open Back: Cut out the back panel and attach multiple horizontal straps.
- The Inverted V-Back: Cut a deep V-shape from the back neckline downwards.
- The Peekaboo Back Slit: A simple vertical slit down the upper back.
Section 5: All-Over Transformations & No-Sew Styles (Ways 81-99)
These ideas change the entire shirt, often without a single stitch required.
- The Side-Woven Tee: Cut the side seams off and weave them back together.
- The T-Shirt Dress: Start with an oversized tee and add side slits or a cinched waist.
- The T-Shirt Vest: Cut off the sleeves and cut straight down the middle of the front.
- The T-Shirt Scarf: Cut the body of the shirt into one long, continuous loop and stretch it.
- The Bodycon Dress: Use a large t-shirt, cut it to your shape, and create tied side seams.
- The T-Shirt Skirt: Cut the top off a t-shirt and add a waistband.
- The Two-Tone Tee: Cut two shirts in half vertically and sew the opposite halves together.
- The Polka Dot Cutouts: Use a hole punch tool to create a pattern of small holes.
- The No-Sew Beach Cover-Up: Use a huge oversized tee, cut a deep scoop neck, and create deep drop armholes.
- The Shrug: Cut a crop top, then cut it down the middle to wear as an open shrug.
- The T-Shirt Necklace: Cut the tee into many thin loops and layer them.
- The Baggy to Fitted No-Sew: Turn the shirt inside out, mark your shape, and tie the excess fabric in knots along the sides.
- The T-Shirt Headband: Cut a strip from the bottom of the shirt to create a stretchy headband.
- The Layered Look: Cut large, random holes in one shirt to reveal a different colored shirt underneath.
- The Geometric Cutout Tee: Cut squares, triangles, and circles all over the shirt.
- The One-Shoulder Top: Cut off one sleeve and the corresponding side of the collar.
- The Gladiator Slashed Tee: Make parallel cuts down the sides and front of the shirt.
- The T-Shirt Halter Top: An easy no-sew design that involves strategic cutting and tying.
- The Combination: Mix any of the above! A cropped, V-neck muscle tee with a laddered back? The possibilities are endless.
Conclusion: Your Wardrobe, Reimagined
There you have it—99 ways to look at that plain t-shirt as a blank canvas. Upcycling clothing is a journey of creativity, sustainability, and personal expression. By using these ideas, you can build a wardrobe that is not only stylish and unique but also a true reflection of your ingenuity. Start with a simple cut, see how it feels, and don’t be afraid to experiment. The best part of DIY fashion is that there are no mistakes, only one-of-a-kind designs.
Frequently Asked Questions (FAQs)
Q1: What’s the best type of t-shirt to use for cutting?
A: A 100% cotton or cotton-blend jersey knit t-shirt is ideal. The fabric is soft, has a little stretch, and the cut edges will roll naturally when pulled, which gives a clean, finished look without any sewing. Avoid very thin or overly stretchy fabrics for your first few projects.
Q2: How do I stop the fabric from fraying?
A: The great thing about jersey knit (standard t-shirt material) is that it doesn’t fray. When you cut it, the edges will curl or roll instead of unraveling, making it perfect for no-sew DIY projects.
Q3: Can I do these designs on a long-sleeve t-shirt?
A: Absolutely! Many of these designs, especially the neckline, back, and hem cuts, work perfectly on long-sleeve tees. There is also a dedicated section above for long-sleeve-specific modifications like thumbholes and elbow cutouts.
Q4: What if I make a mistake and cut too much?
A: Don’t panic! A cut that’s too big can be turned into a new design feature. You can use safety pins for a punk look, weave a ribbon through the gap, or layer it over another tank top to make it intentional. Sometimes the best designs come from happy accidents.
Sofia Bennett is a fashion writer and style observer known for her clean sense of aesthetics and trend analysis. She has covered fashion shows, reviewed designer collections, and interviewed independent creators. Sofia specializes in connecting fashion with real-life lifestyle choices, helping readers understand what looks good — and why.